Taking Homework or Test Assignments
This section provides step-by-step instructions on how to take a Homework or Test. These assignment types permit you to work through the questions in any order. Your instructor's settings will determine the features appearing in your assignment. For example, your instructor can control if you are able to check your work, set a time limit, print questions, see feedback, or save and resume your assignment at a later time.
Note: Assignments that start with a quiz and provide a customized study plan are called Adaptive Study Plans or "Study Tools" assignments. See Taking Adaptive Study Plans Assignments for more information.
Questions can appear in a variety of formats. For Multiple Choice and True/False questions, you select a choice from a list. For other question formats, you may need to enter multiple answers, type short essay responses, or link matching items with your mouse.
 To start an assignment
- 1. Click the Assignments link to open the Assignments page.
- 2. Use the tools on the Assignments page to display your assignments in the most useful way. See Using the Assignments Page for details.
- 3. Open the Assignment Ready page by clicking an option in the Actions column:
- 4. Click the Start Assignment Now button to begin taking the assignment.
- 5. Begin answering questions once your assignment or test is completely loaded.
Take.  Begins your first attempt on a graded assignment.
Practice.  Starts an assignment for review that is Not Graded.
Retake.  Starts an assignment you have previously submitted. However, not all assignments are set up to permit multiple takes.
Resume.  Continues an assignment that you saved in progress. Not all assignments can be saved and resumed.
If a password is required, type it into the Password field.
Note: An assignment may no longer be available, if you have taken it the maximum number of times or if it is past its due date.
If your instructor has set an Unavailable Date and you have not yet scored 100%, you can take an assignment past its due date (although there is generally a penalty).
Before beginning your assignment, review the Assignment Ready page for instructions or any special conditions that apply to your assignment.
You can use the Cancel button to return to the Assignments page instead. By doing so, the assignment is not counted as taken.
Note: The start button label may vary slightly, depending on assignment type or status.
To answer questions
The series of steps below start from the beginning of your assignment take. Use the steps outlined above to load your assignment.
Warning: During an assignment, never close your browser, go to another site, or use your browser's forward and back buttons—you will lose your current work, and your attempt is counted as one of your allowed "Takes." Use only the CengageNOWv2 navigation buttons and links. Be sure each page loads completely before proceeding.
- 1. Read each question carefully for special instructions, and answer as directed.
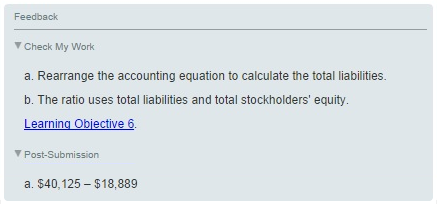
- 2. Evaluate the correctness of your current answer by clicking the Check My Work button (in questions that provide it). This displays a collapsible feed back window where you can see if your answer is "correct," "partially correct," or "incorrect" in addition to additional feedback. This option allows you to improve your answer before submitting the assignment for grading.
- 3. When available, you can click the arrow icons on the Feedback window to collapse or expand either the entire window or individual feedback sections.
- 4. (Optional)
 Click the Calculator icon to open a basic calculator. You can reposition the calculator window within your browser.
 - 5. (Optional) If your instructor has enabled it, you can click Print Item in the heading to print a copy of the current question.
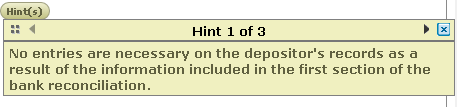
- 6. Click Hints or Show Additional Info (if available) to get help with answering your question.
- 7. Questions with multiple answers may provide a Clear All link, which allows you to let you start that question over.
- 8. Click a number in the Questions column, if you are not automatically advanced to the next question. You can also use the arrow controls in the lower right corner of the page to go to the previous question or the next question in sequence.
- 9. (Optional) Contact Technical Support
 - Click this button to open the Cengage support site in a new browser window.
 - 10. When permitted, you can click the Save and Exit button to finish your assignment in a later session.
- 11. When you are completely finished with all sections of the assignment, click the Submit Assignment for Grading button (labeled Submit Assignment for Practice work or Submit Test for Grading for tests).
- 12. Click Submit for Grading to confirm you want to submit your assignment and exit. Click Continue Taking Assignment to cancel the submission and return to the assignment take.
Feedback icons which evaluate your work can include the following:
Note: Printing items does not work for Flash-based items such as General Ledger (CLGL).
Note: Depending on your assignment's settings, you may also see options for other resources such as your eBook, turning on Audio, related Exercises, Show Me How videos, Dynamic Exhibits, and Spreadsheets.
You can work through most questions in any order. This makes it easy to answer skipped questions and change your previous answers before submitting the assignment for grading.
Note: An assignment may no longer be available, if you have taken it the maximum number of times or if it is past its due date.
However, if your instructor has set an Unavailable Date and you have not yet scored 100%, you can take an assignment past its due date (generally with a penalty).
The Submit Assignment for Grading? message window opens so that you can confirm you are ready to turn in the assignment. It will also caution you if any answers are still incomplete and give you an option to continue the assignment.
Caution: Each time you click Submit Assignment for Grading, you use one of your available takes. Many assignments are set up to permit only one take.
The Assignment Finished or Test Finished page opens to give you several options for your next step.
Depending on the assignment settings, you may be able to see your overall score, click View Assignment Results to review your answers (if allowed by your instructor), Take This Assignment Again (if multiple takes are allowed), or Go Back to the Assignments List.
To save a partially finished assignment
Use these instructions when your instructor has set up your assignment so you can stop the current take and finish it at another time. You will see a Save and Exit button when this option is available.
Once saved, your assignment will continue to appear on the Assignments page with a Resume button for starting your take. Your assignment will continue to be available until the Due Date or Unavailable Date has passed.
- 1. Click the Save and Exit button on your assignment take page to automatically leave and save your assignment.
- 2. Choose between the options to Go Back to the Assignments List or Resume This Assignment.
The Assignment Saved page will open.
You can also open your assignment later by clicking the Resume button on the Assignments page.
Note: Your assignment may no longer be available if you have taken it the maximum number of times or if it is past its due date.
When your instructor sets an Unavailable Date and you have not yet scored 100%, you can continue to take an assignment past its due date (generally with a late penalty).
To review your answers
From the Assignments page:
- 1. Use the tools in the Assignments page to organize your assignments in the most useful way. See Using the Assignments Page.
- 2. Select All Assignments and click the number or status provided in the Score column to open the View Assignment Results page (when your instructor has allowed this option). See Using the View Assignment Results Page for more details.
From the Assignment Finished page:
- 1. Click View Assignment Results.
- 2. The View Assignment Results page opens. See Using the View Assignment Results Page for more details.
Note: The availability of your assignment results can depend on the status of questions that require manual grading or how your instructor set up the assignment permissions.
To print your assignment
From the Assignments page you may be able to print a blank copy of your assignment.
- 1. Use the tools in the Assignments page to display your assignments in the most useful way. See Using the Assignments Page for more details.
- 2. Click the Print blank assignment button for the assignment you want to print and the assignment will appear in a new browser window.
- 3. Click the Print button to open your browser's your printing preferences.
- 4. Click Print again once your preferences are set.
Note: You can print your assignments only if your instructor set the permission to allow it.