Fill in the Blank
Fill in the Blank (FITB) questions ask students to respond to a question by entering or selecting specific numbers, words, equations, or other answers in the provided answer fields. This question type supplies electronic grading while providing some of the versatility of an Essay question.
CNOWv2 allows you to include images, equations, graphics, and tables in a question. You have the option to provide unique rejoinders (feedback) for any student response, whether they are correct or incorrect. You can also use multiple answer fields of different types in a single question.
The type of response required from the student is determined by the style of answer field you select. Fill in the Blank question supports the following types of answer fields:
- • Chem. Supplies students with a Chemistry Formula editor to help them construct their response. In addition to providing Greek symbols, the editor also assists with formatting subscripts and superscripts.
- • Number. Allows the student to create a response based on a numeric value. Letters and other non-numeric characters are not allowed, with the exception of negative signs and x, *, or E for scientific notation. By default, this answer field has a tolerance of .1%.
- • Text. Provides students with the ability to enter a short, text-based response. Letters, numbers, and other characters are allowed as well.
- • Select. Supplies students with a dropdown menu containing several choices from which they can select their answer.
Properties Specific to Fill in the Blank Questions
When authoring FITB questions, after you have selected the type of answer field, you are required to create the correct response from the Answers tab.
It is important to keep in mind that FITB questions are unique as they are equipped to handle more than one correct answer per question. Clicking the Add answer link provides additional input fields where you can create a variety of potential answers. This allows you to provide specific feedback to several different responses.
When editing Select answer fields, you use these fields on the Choices tab to enter the content for each possible answer.
From the Edit properties tab, you use the Grading Mode menu to specify whether all parts of the question need to be answered correctly to get full credit or whether partial credit is allowed. This property provides a useful grading option for questions set up to accept more than one answer.
- ° All correct answers required. Used when every aspect of the answer needs to be correct for credit to be given.
- ° Permutated credit given. When this option is selected, credit is given no matter what order the answers are in. Only a totally incorrect response causes a loss of credit.
- ° Partial credit given. Used to provide partial credit in cases where some of the answers are correct.
For problems with more than one correct answer, the method for calculating Partial credit is (#correct - #incorrect) / #total_correct.
From the Answers tab, you can use the Rejoinder field to create a message that appears for specific answers.
For Number answer fields, the Tolerance option allows you to set a value as a percentage for the allowable deviation for a correct response.
Example
This example shows how to create a Fill In The Blank question using the Select style of answer fields. When you choose a Select answer field, a dropdown menu is added with multiple choices from which your students can select. Students must provide all correct answers to get a score of 100% for the question.
Note: Before getting started, be sure to read the tips and instructions provided in the editor's text fields. If not removed, however, the instructional text will continue to appear when the question is saved and published to your available content list.
 To create a Fill In The Blank question
- 1. Click the Self-Authored Questions link on the Assignments page to open the Instructor Authoring page.
- 2. Click the Create button to open the Create a New Folder and/or Question dialog box.
- 3. (Optional) Use the dropdown Folder menu to select an existing folder to place your question. Select New Folder to create a new folder.
- 4. Select Accounting as the Discipline menu.
- 5. In the Question Template menu, select Fill in the Blank Template.
- 6. Enter an appropriate name in the Question Name field.
- 7. Click OK to display the FITB template in the editing window.
- 1. Click the Home tab if it isn't already open.
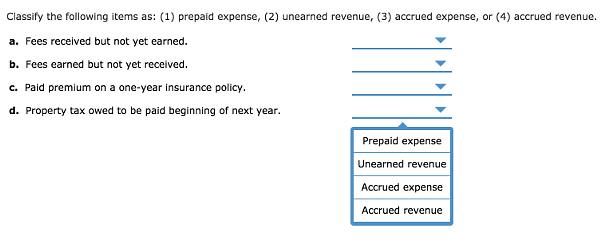
- 2. For this example, in the Question text field, type "Classify the following items as: (1) prepaid expense, (2) unearned revenue, (3) accrued expense, (4) accrued revenue.."
- 3. In the next line, type "a. Fees received but not yet earned.," ending with a space and leaving your cursor at the end of the line.
- 4. Expand the Insert field menu to place an answer field at the location of your cursor.
- 5. Insert a select field type by positioning your cursor and choosing select from the Insert Field menu.
- 6. For the next lines in the Question tab, type "b. Fees earned but not yet received.," "c. Paid premium on a one-year insurance policy.," and "d. Property tax owned to be paid beginning of next year.."
- 7. Insert a select answer field at the end of each line.
- 8. (Optional) Use the tools on the Question Editor to insert any images, tables, formulae, symbols, or popups you would like to include.
- 9. (Optional) Click the Format tab to use the text formatting editor.
Note: When an answer field is first created, this automatically opens the Answers, Choices, and Settings tabs. You can choose to work in these tabs now, or return to them later by clicking an answer field in the Question window.
Refer to the next sections, Entering the answer field selections and Specifying the correct and incorrect answers, for details.
- 1. Open the Choices tab, if necessary, by clicking on an input field on the Question tab. (The Choices tab is only available when you are editing a Select answer field.)
- 2. Click Add choice for each response you would like to associate with this specific answer field.
- 3. Enter a possible answer in each field.
- 4. Click Save on the Choices tab when you are done.
For this example, the responses in the Choice # text fields are: "Prepaid expense," "Unearned revenue," "Accrued expense," and "Accrued revenue."
- 1. Open the Answer tab, if necessary.
- 2. Under Answer 1 select the correct response from the dropdown answer field.
- 3. Select Correct as that answer's status.
- 4. (Optional) Enter a message for this response in the Rejoinder 1 field.
- 5. Click Add answer and repeat these steps for the remaining choices, selecting the appropriate correct/incorrect status and creating rejoinders as needed.
- 6. Repeat these steps for every Select answer field in your question.
- 7. Click Save on the tab to save your work in progress.
Note: See Properties and Functions on the Answers Tab for additional details on common properties in correct answers.
- 1. Click the Question link in the heading.
- 2. In the Home tab's Question Editor, click the Edit Properties icon.
- 3. (Optional) Enter a descriptive name to be used in assignments and grade reports in the Display Name field. For example, you can use something similar to how the question is named in the textbook.
- 4. In the Grading Mode dropdown menu, select Partial credit given.
- 5. In the Electronic Gradability dropdown menu, select electronically gradable.
- 1. Click the global Save button at the top of the Instructor Authoring page.
- 2. (Optional) Click Preview to see a working example of your question.
- 3. Click Publish when the question is complete to save it to your Available Questions in the Create Assignment wizard.
- 4. Click the Done button at the top of the screen when you are ready to exit the Question Editor.
You can also return to the Instructor Authoring page to edit and publish your questions at a later time.
Note: Your new questions and/or edits will not appear in the assignment creation wizard unless you save your work in the question editor and then click Publish.